22.3. Using the logbook in an experiment
Before you start data taking, you should add the logbook subsystem to the readout GUI. This is done by adding the following line to your ReadoutCallouts.tcl file:
Simple as that. Since the logbook subsystem makes use of the callback bundle facility of the readout GUI, you don't need to add any code to any of your Onxxx procs.
For all runs with recording enabled, the logbook will log all state transitions associated with a data taking run. These include Begin runs, End Runs, Pause runs and Resume runs. Furthermore, when the ReadoutGUI starts and the logbookbundle is pulled in, the bundle checks for a run in progress (from the database point of view). This can happen if the previous run was improperly ended and the ReadoutGUI needed to be restarted.
If there is a currently active run, the logbook will log an EMERGENCY_END state transition for that active run. This makes the run inactive and creates a log entry that lets you know, when you review that run later on, it was improperly ended.
Since the logbook bundle will immediately access the database, and since it may also need to log a state transition, prior to starting the ReadoutGUi you must:
Ensure you've selected the correct current logbook using lg_current.
Set the current shift using lg_selshift
If you neglect to do so you will get errors reported by the ReadoutCallouts.tcl.
22.3.1. Creating notes
If all the logbook could do is manage shifts and log run state transitions it would be pretty worthless. The notes feature of the logbook is what makes it worthwhile. In this section we'll learn:
What a note is
How to create notes
How to format notes with rich content (including figures).
Note that in the next section Browsing and rendering the logbook we'll talk about what we can do to look at the contents of our logbook and how to render it for printing.
22.3.1.1. What is a note?
A note is a formatted chunk of text. My formatted I mean that it can have titles, subtitles, bulleted lists, numbered lists, code samples, referencdes to the web and inline images. We'll cover formatting notes in How do I use Markdown to format my notes?
All notes are written by someone. That is, they are associated with one, and exactly one person that is known to the logbook.
Notes may, or may not be, associated with a run. When choosing if a note should be associated with a run, think about wether the content of the note has to do with the run or is a more general statement that spans the course of more than one run.
Notes also have a timestamp associated with them that logs when they were created.
While author selection and run association are done manually by the person editing and saving the note, the timestamp is generated automatically when the note is saved.
As with most entities in the logbook (other than shift membership), notes are write-once, read-many. As with a paper lab notebook, you're not allowed to modify or delete a note once it's been written.
22.3.1.2. How can I create a note?
Notes are created using the note editor. This can be brought up either inside the browser (see Browsing and rendering the logbook), or via the the lg_wrnote command.
You can invoke lg_wrnote in one of two ways:
Example 22-7. Invoking lg_wrnote
$DAQBIN/lg_wrnote   5            # Note editor initially associated with run 5.
$DAQBIN/lg_wrnote                # Note editor with no initial run association.
Note carefully, in the above, the word initially. The note editor provides a mechanism to set, or for that matter, remove association with a run. The note editor GUI. shows what the note editor looks like.
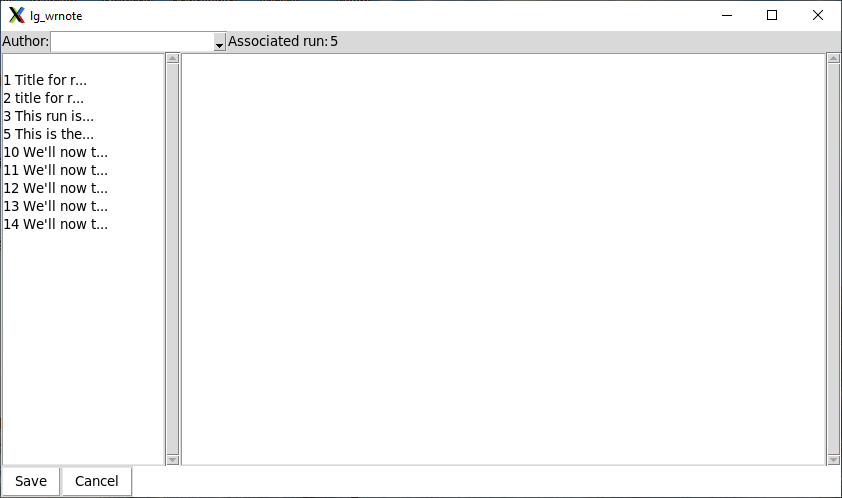
Current author and run association is shown at the top of the window. Author association is a pulldown menu activated by the down arrow to the right of it. Select your name as it's know to the database from the list of authors. Initially no author is shown as associated with the note. If you try to save the note without selecting an author an error will be thrown.
To the right of the author assocationis the run assocation. In the figure, the note we are composing will be associated with run 5. To change the run assocation, select a run from the list in the list box at the left of the editor window. For convenience, the first few characters of the title are provided to the right of the run number. Simply double click the run the note is to be associated with to change the associated run. If you don't wann a run associated with this note, just double click the empty line at the top of the listbox.
The largest area of the editor is the big frame at the right. Edit the text of your note in this area. We'll talk a bit more about what you can put there besides ordinary text in How do I use Markdown to format my notes?.
Image references can be manually inserted but, not only is the markdown for that a bit tricky to remember, but you may want to browse for the image file to insert. If you right click in the editor window a context menu will be posted. The menu command will bring up a dialog that allows you to specify the image file (must be an image file or rendering of the note will fail), and a caption for the image:
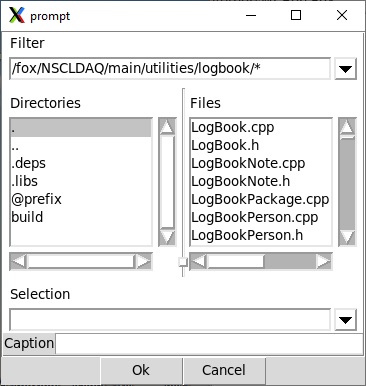
Use the file browser to select the image file and enter any desired caption in the caption entry at the bottom of the dialog. Click , and the correct image link will be inserted at the cursor position in the editor. Click to cancel creation of the image link.
When the note has been formatted as you want it, click to save it to the logbook or to abandon the note.
Note that the images in image links are loaded into the database so it's not necessary to retain the image files in the filesystem after the note has been saved.
22.3.1.3. How do I use Markdown to format my notes?
This section is a non-exhaustive primer on markdown format. Markdown is a simple, plain text, formatting system. It allows you to easily create rich content. Markdown is used in many wikis, as well as in gitlab and github to support formatted text.
The full description of Markdown is beyond the scope of this document. http://https://www.markdownguide.org/ describes Markdown fully. We use two markdown processors to render content:
- Tcllib's Markdown package
This simple package is used to render HTML output which is then opened in a web-browser.
- pandoc
This program converts markdown to several formats. We use it to convert Markdown to PDF format. Note that pandoc, generates input for LaTeX which actually produces the PDF via its processing chain.
But I digress. Let's dig into markdown format. First of all, text that begins in column 1 is just rendered, for the most part as is. Here are some things in column 1, however that can modify this
- Headings
A number of pound symbols # specifies the text on the same line to be a heading one pound is a top level heading, two a second level heading, and so on.
An alternate syntax for level 1 and two headings: A line of text with a bunch of = underneath it is a level 1 heading. A line of text with a bunch of - underneath it is a level 2 heading.
- Inline formatting (emphasis).
Text surrounded by pairs of * will be rendered as bold face. For example **this is bold face**.
Text surrounded by single * will be rendered as italic. For examplle *this text is italic*.
- Lists
Both bulleted and numbered lists are supported.
If a series of lines are each preceded by a number and period they are rendered like a numbered list for example:
The list starts below:
1. List element 1
2. List element 2
And is over here.
If a series of lines are ech preceded by a - they are elements of a bulleted list for example:
List starts below
- First bullet
- second bullet
List ends.
Note that many markdown processors require an empty line before and after lists.
- Weblinks
A link to some bit of the web requires both link text and the actual URL. These are specified as follows: [link text](URL) For example:
There's a lot of (information about markdown)[http://google.com/search?q=markdown]
Will generate link text information about markdown that, when clicked will give google results for markdown.
- Image links
I strongly suggest letting the note editor produce these for you, but for completeness, an image link has the form:  The use of the stuff in [] depends on the output format. For web this is used as what is called alt text, that is text that is shown in browsers that are not capable of displaying images. Do not count on this text being displayed.
- Tables
The simplest format for a table in markdown uses pipes. For example, this markdown:
You should put a blank line fore:
| Animal | Species |
| -------|---------|
| Wolf | canis lupus |
| Cat | felis domesticus |
| Golden Hamster | mesocricetus auratus |
and aft.
Note that the table doesn't have to line up nicely. The markdown above generates something like:
- Footnotes
A link to a footnote isof the form [^n] where n is a footnote number (e.g. [^1] for footnote). The footnote text itself (for footnote 1 e.g.) is entered as follows:
I would put a blank line fore:
[^1]: See the NSCL radiation safety manual for more
And, if appropriate aft.
In the web, the footnote text will, most likely, render in position in the document while LaTeX will determine where it shows up in PDF rendering.
- Internal document links
A heading can have an identifier attached to it and links to that identifier for example:
Table of contents:
...
[Some Section](#Some-section)
...
## Some Section {#Some-section
}
Creates a link to a level 2 heading in the document named Some Section.
Markdown can do much much more. I encourage you to play with a toy logbook and browse through https://www.markdownguide.org/basic-syntax/ for basic syntax supported by all markdown processors and https://www.markdownguide.org/extended-syntax/ for syntax most markdown processors support. I have not exhaustively checked which bits of extended markdown are supported by the Tcl Markdown package and pandoc. Play around and see what you get.
22.3.2. Browsing and rendering the logbook
A logbook you can write in but can't look at is worthless. This chapter describes the lg_browse command which provides a graphical browser for the logbook.
For now let's just look at the main features of the browser.
In a bit we'll take deeper dives into the user interface. For now note the tabs at the top of the interface:
- LogBook
Allows you to browse the runs, notes associated with runs and notes not associated with any run.
- Shifts
Allow you to view the shifts you have created, as well as the members of those shifts.
- People
Allows you to brows the people that you've added to the logbook.
22.3.2.1. People Tab
Let's look at the contents of the People tab:
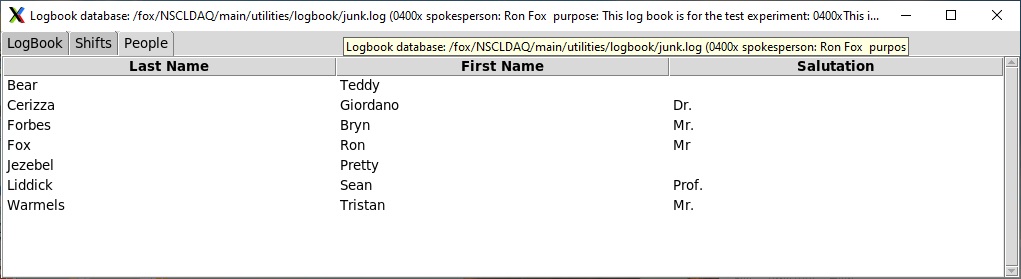
As you can see, this tab provides a list of the people that have been added to the logbook. If you right click anywhere in the list, you'll bring up a context men. Clicking on this menu will allow you to specify the first name, last name, and optional salutation of a person to add the logbook.
22.3.2.2. Shifts Tab
Let's have a look at the shift tab of the browser:
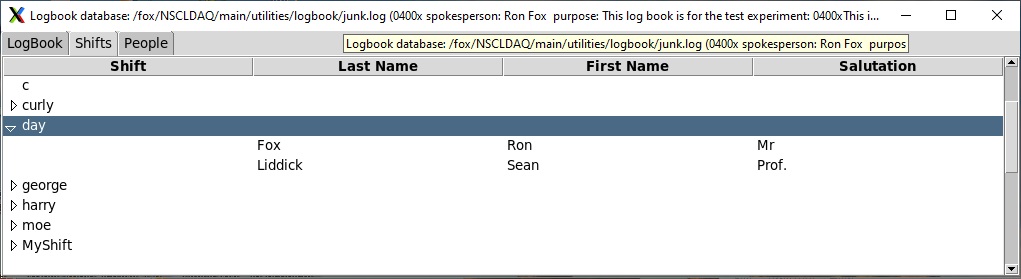
As you can see the shifts are listed. Clicking on a shift opens it up (as has been done for the day shift) to list the members of that shift. If there's a current shift, the word (current) is shown by its name.
If a shift or one of its members has been selected, right clicking brings up a context menu with the following commands:
Brings up the shift editor so that you can add a new shift and populate it with members.
Brings up the shift editor with the currently selected shift loaded into it for editing or for use as a starting point to create a new shift.
Makes the selected shift the current shift. That shift will be associated with run state transitions.
22.3.2.3. LogBook Tab
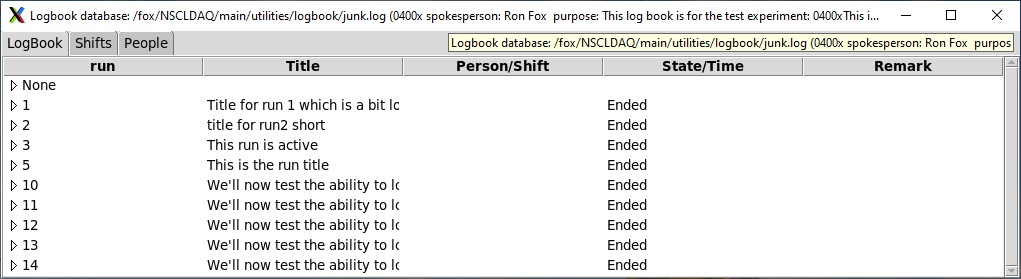
During and after a run, you will probably spend most of your time on the LogBook tab. This tab allows you to access all of the runs that have been recorded and notes that have been written. The figure below shows this tab with some of the items expanded:
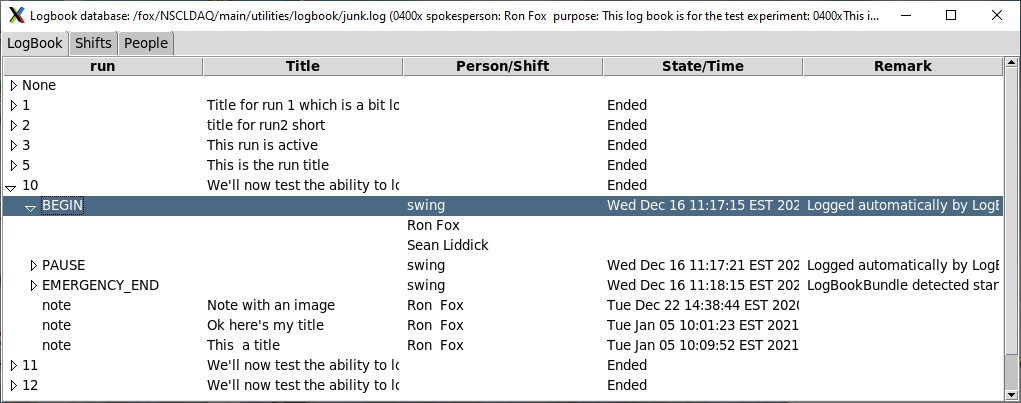
First note that this tab, as with all tabs in the browser periodically updates its contents. This is done in such a way as to preserve the open items. Thus changes performed by other programs and other people are reflected dynamically by the browser.
At the top of the list of items in this tab, is an entry labeled None. If this is expanded you will see a list of the notes that were created that were not associated with any run.
Below that, each numbered entry is a run. The title for the run is shown on that line as well as the state of that run. In this example, there are no active runs. Expanding a run lists all of its transitions, when they occured and the remarks associated with each transition (in this case that they were automatically logged), and name of the active shift when the transition occured. Finally the transition time is aslo shown
Each transition can be further expanded. When that's done the list of people on that shift are listed.
Entries are also shown for each note associated with the run. In this case the notes were added after the run ended (perfectly legal), The notes, however are normaly interleaved with the transitions so that everything that was done with a run is listed in chronological order.
At any time a single item can be selected. right clicking brings up a context menu with the following actions:
Allows you to compose a new note. If the selected item is in a run (vs. in the None) item, the initially selected associated run in the note editor will be that run. If you want to associate the note to a different run or write a new note not associated with any run, naturally, you can change this association in note editor.
Creates a PDF file from the selected item. If a run or a transition within a a run is selected a PDF of all of the items (transitions and notes) will be created. If a note is selected only that selected note will be converted.
You will be prompted for the path of the PDF file to be created. Due to restrictions in the pandoc markdown->PDF conversion software this file must have a .pdf extension.
Renders the entire logbook as a PDF. You will be prompted for a PDF filename (extension must be .pdf). The logbook will be rendered in the following order: First the runs and their contents (transitions and notes) will be rendered. Finally, the notes not associated with any runs will be rendered in chronological order.
Finally, double clicking a note will build an HTML rendering of the note and invoke your default web browser to view it.
22.3.2.4. lg_print
Sometimes you may want to produce PDF for a logbook, or a part of a logbook without bothering with the browser application. lg_print allows you to do that. The lg_print command can produce PDF for the entire logbook or specified parts of the logbook, in the order you specify.
lg_print requires a PDF filename which must have the extension .pdf in order to comply with the pandoc converter needs. The remaining command parameter specify run numbers or the text none. For each run number the run is rendered in PDF (as in lg_browse). If none is specified the notes not bound to any run are rendered in chronological order.
Here are some examples:
Example 22-8. Using lg_print
$DAQBIN/lg_print logbook.pdf                    # print the whole logbook.
$DAQBIN/lg_print logbook.pdf none 1 2 3         # print unassoc notes,  runs 1 2 3
$DAQBIN/lg_print logbook.pdf none               # Print only unassoc notes.
$DAQBIN/lg_print logbook.pdf 1 2 3 10           # print runs 1 2 3 10.
Invoking lg_print with no parameters will output simplified usage help text.